

Mimaki CG-160FXII Plus Roll-Based Cutter
- Sajid Malik
- Apr 25
- 7 min read


If you're running a sign shop or wide-format print operation and you've outgrown your entry-level plotter, the Mimaki CG-160FXII Plus is probably already on your shortlist. Good. It belongs there but not for the reasons most spec sheets explain.
This isn't a surface-level rundown of numbers. It's a breakdown of how this machine performs inside a real production workflow, where the difference between 100 cm/s and 60 cm/s isn't just speed, it's the difference between hitting a same-day deadline and missing it.
What the Mimaki CG-160FXII Plus
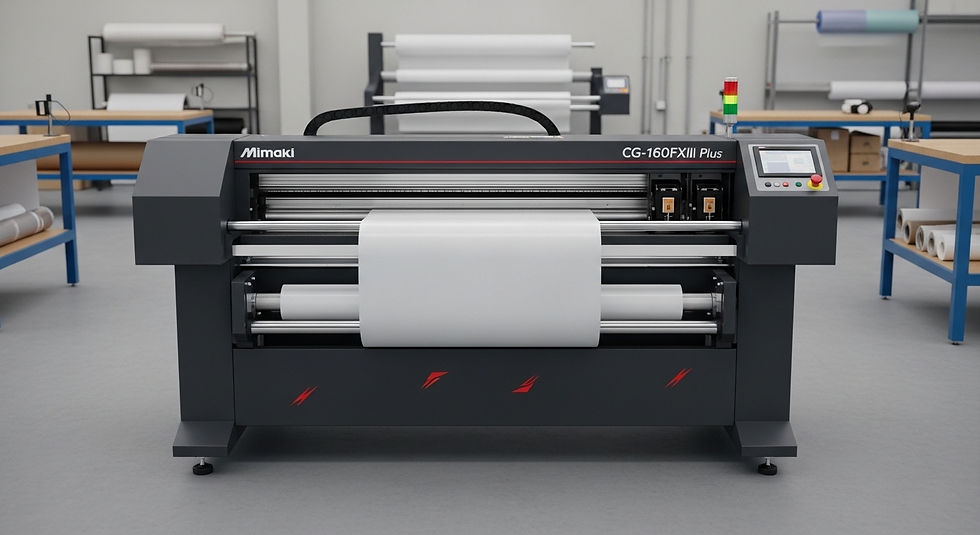
The Mimaki CG-160FXII Plus Roll-Based Cutter is a wide-format, roll-fed vinyl cutting plotter designed for high-volume sign and graphics production. It supports media widths up to 160 cm (approximately 63 inches), delivering a maximum cutting speed of 100 cm/s and a cutting force of up to 400g, with an integrated ID Cut system for automated contour registration.
That last part ID Cut is where most competitor guides stop at the definition and move on. They shouldn't. It's the feature that separates this machine from cheaper alternatives in actual day-to-day use.
The CG-FXII Plus series targets production environments running continuous jobs vehicle wraps, cut-vinyl lettering, contour-cut stickers printed on a separate inkjet system, and promotional display graphics. According to Mimaki Global's 2024 product documentation, the CG-FXII Plus series was engineered to replace manual registration workflows with automated optical detection, reducing setup time per job in multi-unit print-and-cut operations.
ID Cut: The Workflow Feature That Changes Everything
Most production managers who've used the older CG-FX series already know the frustration. You print a roll of contour-cut stickers on your inkjet printer. You feed the roll into your plotter. You manually align the registration marks. Three passes in, the media shifts and you've just wasted 2 meters of 3M Scotchcal Graphic Film.
The CG-160FXII Plus fixes this at the hardware level.
Here's the thing: ID Cut doesn't work like a standard optical sensor that just reads ARMS (Advanced Registration Mark Sensing) marks. It reads a unique barcode printed alongside the job on the roll. That barcode carries job-specific cutting data scaling, rotation, origin point and the plotter retrieves it automatically when the roll is fed.
How ID Cut Works in Practice:
To execute a contour-cut job using ID Cut, follow these steps:
Print the job file with the ID Cut barcode enabled via FineCut9 or RasterLink7 RIP.
Load the printed roll into the CG-160FXII Plus media path.
The optical sensor reads the barcode and auto-loads the cut data.
Confirm cut origin on the control panel.
Press cut registration is automatic from this point forward.
No manual alignment. No operator standing over the machine between passes.
How to Set Up FineCut9 for Contour Cutting. This matters most in two scenarios: unattended overnight cutting runs, and shops where the print operator and the cutting operator are different people. In both cases, ID Cut removes the human variable from registration accuracy.
Cutting Speed and Pressure: Reading the Specs Correctly

Quick note: 100 cm/s is the maximum speed rating, not the operational default. Cutting speed and quality are inversely related in any drag-knife system and experienced operators know this.
At maximum speed, the CG-160FXII Plus is suitable for straight-line cuts in low-tack calendered vinyl. The moment you introduce tight radii or intricate lettering, you'll drop to 40–60 cm/s for clean corners. That's still significantly faster than mid-tier cutters operating at 60 cm/s maximum.
The 400g cutting force is the number that matters more for production shops. Here's why:
Standard cast and calendered vinyl films require 30–80g. Sandblast stencil material, reflective sheeting, and thicker specialty laminates can demand 200–350g. An entry-level plotter maxing at 250g cuts you off from entire product categories. The 400g ceiling on the FXII Plus means you're not buying a second machine for heavy media.
Some operators argue that downforce above 300g causes blade deflection and wears out cutting strips faster. That's valid for continuous 8-hour runs at maximum pressure. For intermittent heavy-media jobs, it's a non-issue. If your shop runs sandblast stencil work daily, verify with your Mimaki dealer on blade and strip replacement schedules.
Over-Cut and Corner-Cut: Solving the Weed Problem
This is the section most reviews skip entirely.
Anyone who's weeded complex contour-cut graphics on a production timeline knows the problem: the blade path technically completes, but the corners don't release cleanly. You end up with small vinyl "flags" hanging at sharp corners connected by a thread of material the blade almost-but-didn't-fully-cut through.
Or maybe I should say it this way: you've just spent 45 minutes weeding a job that should have taken 10.
The CG-160FXII Plus addresses this with two functions:
Over-cut extends the blade path slightly past each cut endpoint, ensuring complete severance at line terminations. The extension distance is adjustable in the software typically 0.1 -- 0.5mm depending on media thickness.
Corner-cut adds a micro-cut at acute angles, releasing the corner flag before it becomes a weeding problem. It's a small thing. It saves enormous amounts of time at scale.
Mimaki Global Product Page. Users who've run both the older CG-FX and the FXII Plus consistently report that weeding time drops noticeably after enabling these two features particularly on intricate logo cuts and lettering below 30mm cap height.
Software Integration: FineCut9 and RasterLink7
The CG-160FXII Plus communicates natively with two Mimaki software platforms.
FineCut9 is a plug-in for Adobe Illustrator and CorelDRAW. It handles contour path generation, ID Cut barcode embedding, and job parameter settings directly inside the design environment. For shops where designers control their own output, this is the standard workflow.
RasterLink7 is the production RIP. It handles print-and-cut workflows when the CG-160FXII Plus is paired with a Mimaki inkjet printer (JV, JFX, or CJV series). RasterLink7 manages color profiling, registration mark placement, and ID Cut data simultaneously which is why it's the preferred tool in larger operations with separated print and cut stations.
Quick Comparison:
Option | Best For | Key Benefit | Limitation |
FineCut9 | Design-led studios | Direct Illustrator/CorelDRAW integration | Requires manual RIP for complex color |
RasterLink7 | Production print shops | Full print-and-cut automation with ID Cut | Higher cost, steeper learning curve |
Third-party RIP | Mixed-brand environments | Flexibility across device brands | ID Cut barcode may not be supported |
Label: Quick Comparison Software Paths for the CG-160FXII Plus
RasterLink7 Setup for Print-and-Cut Workflows. I've seen conflicting data on third-party RIP compatibility — some sources indicate GPGL command support allows basic cutting from non-Mimaki RIPs, while Mimaki's own documentation recommends FineCut9 or RasterLink7 for full ID Cut functionality. My read: use native software if ID Cut is a primary reason you're buying this machine.
Media Handling at 160cm Width: What Changes

Running 160cm (63-inch) media isn't just a wider version of running 60cm rolls. The physics change.
Roll weight increases significantly. Tracking error lateral drift over long cuts compounds over distance in ways that don't appear on shorter runs. The CG-160FXII Plus addresses this with a dual-pinch-roller system and a media flange design that maintains consistent lateral tension across the full media width.
For shops cutting vehicle wrap panels or large-format floor graphics in single pieces, the 160cm width eliminates seam lines that would otherwise require alignment during application. That's a direct labor cost reduction.
Look, if you're currently running two narrower cutters in parallel to produce 60-inch output, here's what actually works: a single CG-160FXII Plus running at 70 cm/s will outpace both units combined on jobs that require matched registration across panels, because you eliminate the alignment step entirely.
The tracking length specification confirmed at 50 meters per Mimaki's 2024 spec sheet means the machine can handle full production rolls without manual re-feed interventions. Most competitor cutters at this width class specify 15–25 meters before recommending re-registration.
Who Should Actually Buy This Machine
This works best for: sign shops running 20+ contour-cut SKUs per week, vehicle wrap studios, and print operations with a paired Mimaki inkjet workflow where ID Cut adds immediate ROI.
It won't help if: your primary volume is simple rectangular cuts, you're running exclusively non-printed substrates, or your budget ceiling is below the FXII Plus price tier in which case the CG-75FXII Plus or a competitive alternative at lower width deserves evaluation first.
Most people assume the 160cm width is the headline spec. The data says otherwise shops that cite the strongest ROI from the FXII Plus series consistently point to ID Cut elimination of registration labor, not the raw width or speed numbers.
What most guides skip is the consumable factor: the FXII Plus uses Mimaki's PHP31 blade holder system. Blade availability and cost should factor into your TCO (total cost of ownership) calculation before purchase, particularly if you're running abrasive media like sandblast stencil or metallic laminates regularly.
FAQs
Q: What's the best software to use with the Mimaki CG-160FXII Plus?
A: FineCut9 works best for Illustrator and CorelDRAW users. For full print-and-cut automation with ID Cut, RasterLink7 is the preferred RIP in production environments. Both are native Mimaki platforms.
Q: How do I set up an ID Cut on the Mimaki CG-160FXII Plus?
A: Print your job through FineCut9 or RasterLink7 with the ID Cut barcode enabled. Load the printed roll the plotter's optical sensor reads the barcode and loads cut data automatically. No manual registration is needed.
Q: Should I use over-cut on all media types?
A: Use over-cut on most vinyl and film materials. Reduce or disable it on very thin or delicate media where a small extension cut might cause tearing at termination points. Test on a sample strip first.
Q: Why does my Mimaki cutter drift on long roll cuts?
A: Lateral drift on long cuts usually indicates uneven roll tension or worn pinch rollers. Verify roll flanges are correctly seated and check pinch roller pressure settings. The CG-160FXII Plus dual-roller system is designed to minimize this check Mimaki's media setup guide for your specific substrate.
Comments