
Why Is Your Printed DTF Film Turning Oily? Causes and Fixes

Oily residue on printed DTF film comes from four sources: leftover glycerin in your white ink, incomplete curing, excess humidity, or ink oversaturation. Any one leaves your transfers looking greasy, even when the design is printed perfectly. This guide from Alpha Print Supply explains why DTF transfer film turns oily, how to fix transfers that already show it, and how to stop it from coming back.
What Causes Oily Residue on DTF Film?
Cause | What's Actually Happening | Fastest Fix |
Glycerin in white ink | Humectant doesn't fully evaporate during curing | Extend cure time, add a pre-dry step |
Incomplete curing | Trapped moisture surfaces after cooling | Raise oven temp to 120-140°C |
Excess ink saturation | Ink volume exceeds what curing can process | Cut RIP ink density 10-15% |
High humidity | Film absorbs moisture before or after printing | Hold workshop RH at 40-60% |
Low-quality film/powder | Inconsistent coating traps moisture unevenly | Switch to premium film and powder |
Oily marks on printed DTF film are not actual oil. They form when moisture, humectants, or unmelted TPU powder rise to the surface during curing or storage. Five factors drive this:
1. Glycerin in Your White Ink
DTF white ink contains a humectant, usually glycerin, that keeps your printhead from clogging. Glycerin is thick, clear, and pulls moisture from the air, and it resists drying under normal curing. If your cure doesn't fully drive off this moisture, glycerin migrates to the film's surface over the following days and leaves a greasy sheen.
2. Incomplete Curing
Your printer cures roughly 40% to 50% of the white ink before the film reaches the powder shaker. The rest cures during the powder melt stage, typically 110°C to 140°C. If your oven runs cold, short, or uneven, water trapped between the PET film and melted powder never fully escapes, and it surfaces later as oil.
3. Excess Ink Saturation
Overprinting floods the film with more ink than curing can handle. The excess cannot cure properly in the time available, so it sits on the surface as a glossy residue, most often on solid color blocks and heavy white underbases.
4. High Humidity During Printing or Storage
Workshop humidity above 60% relative humidity lets your printed film absorb moisture before it reaches the powder shaker. That moisture condenses during curing and reacts with the ink. Humidity also affects film already printed and stored, which is why oily spots sometimes appear days after a batch looks fine.
5. Low-Quality Film or Powder
Budget PET film often lacks the coating consistency that lets moisture escape evenly during curing. Inconsistent hot melt powder melts unevenly too, trapping moisture instead of forming a clean bond. Both show up as oily patches in specific areas rather than across the whole design.
How to Fix Oily DTF Transfers You Already Printed
Most oily transfers respond well to a re-cure, so you rarely need to reprint the whole batch.
Re-heat the affected transfer at 300°F to 320°F for 10 to 20 seconds. This finishes the cure and often eliminates the shine.
Check the transfer right after re-curing. If the greasy look returns within minutes, the moisture is still trapped and you need a longer cure, not a hotter one.
Set aside transfers with heavy oily buildup for reprinting instead of production. A transfer that never fully cured won't bond as well, even if it looks fine after peeling.
How to Prevent Oily Residue From Coming Back
Fixing oily film after the fact costs time you don't get back. These five adjustments stop the problem at the source.
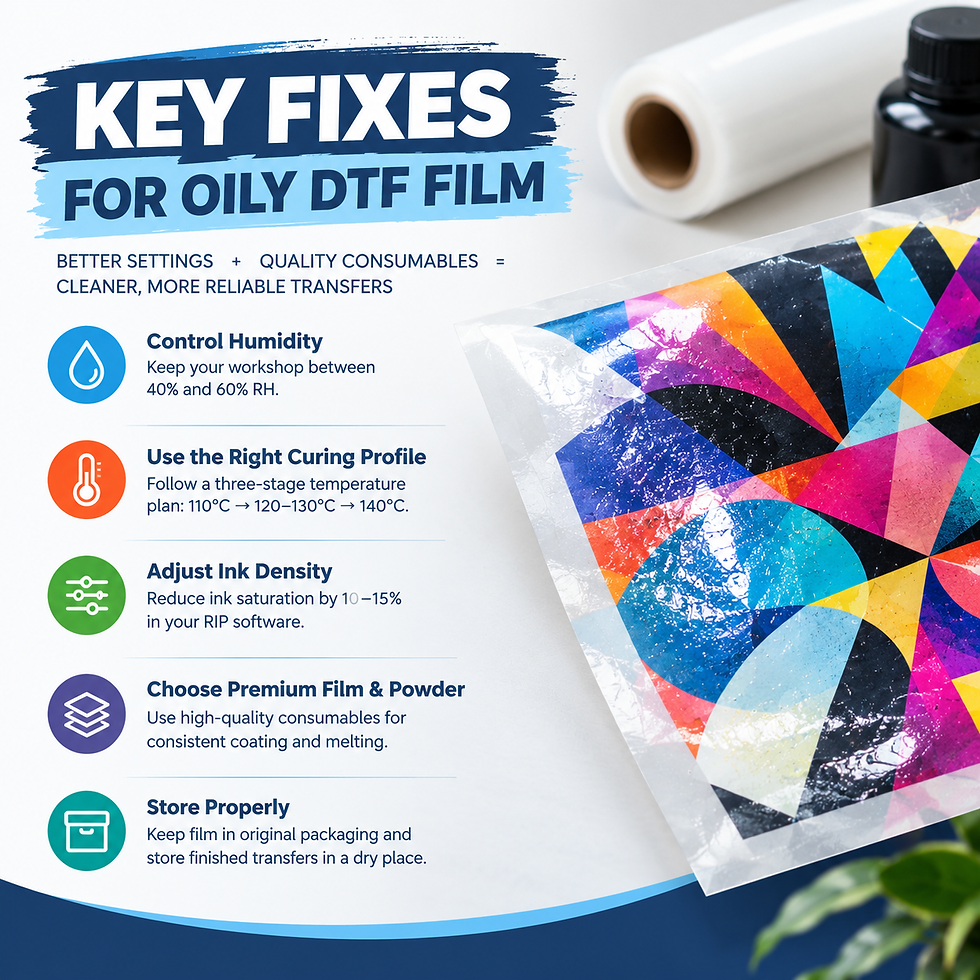
1. Keep Workshop Humidity Between 40% and 60%
Install a dehumidifier or air conditioner and run it whenever ambient humidity climbs. Close doors and windows during weather swings instead of relying on exhaust fans, which pull humid outside air straight in.
2. Set Your Curing Temperature in Three Stages
A single-temperature cure often leaves moisture behind. A three-stage profile works better: 110°C to let vapor escape as powder starts to melt, 120°C to 130°C to address the glycerin, and 140°C to fully melt the powder into a clean bonding layer. One-zone equipment can extend dwell time instead.
Stage | Setting | Purpose |
Stage 1 | 110°C | Release water vapor as powder starts to melt |
Stage 2 | 120-130°C | Process glycerin content in the white ink |
Stage 3 | 140°C | Fully melt powder into a clean bonding layer |
Workshop humidity | 40-60% RH | Prevent moisture absorption before and after printing |
3. Lower Ink Density in Your RIP Software
Reduce ink saturation by 10% to 15% on solid color and white underbase layers. This gives curing enough time to process the ink fully, instead of racing to catch up.
4. Upgrade to Premium Film and Powder
Film with strong, consistent water absorption lets curing work the way it's supposed to. Alpha Print Supply's Ultra Premium Double Matte Hot Peel film is built for even coating and reliable moisture release, cutting down on oily surprises even in humid shops. Pair it with Rustic United TPU hot melt powder for a cleaner melt.
5. Store Printed Transfers the Right Way
Return unused film to its original packaging after every session and keep it off the floor and away from exterior walls. If you print in batches, seal finished transfers and store them somewhere dry until you're ready to press. Poor storage is one of the most overlooked causes of oily film showing up days later.
When It's Time to Upgrade Your Consumables
If curing temperature and humidity are dialed in and oily film still shows up, your consumables are the limiting factor. Inconsistent coatings and low-grade powder can't be fixed with process changes alone. Alpha Print Supply stocks Rustic United DTF Ink alongside film and powder built to work with it, so your stack cures the same way every time. Shops running a 24" STS Automatic S-20 Powder Shaker also get a more even powder distribution, cutting down the uneven melting behind localized oily patches.
Final Thoughts: Stop Fighting Oily Transfers
Oily residue on DTF film almost always traces back to moisture that never fully left the transfer, whether from glycerin, humidity, or an incomplete cure. Fix the curing profile, control your workshop humidity, and use consumables built to work together, and the problem stops repeating. If you're ready to eliminate oily transfers for good, Alpha Print Supply can help you build a consumables stack matched to your production volume. Reach out to our team today for personalized recommendations and start printing cleaner, more reliable transfers.
Frequently Asked Questions
Why does my DTF film look oily after it cools, even though it looked fine out of the oven?
Moisture trapped between the film and powder layer needs time to surface. The transfer can look clean right after curing, then develop a greasy sheen as it cools. Re-curing at 300°F to 320°F for 10 to 20 seconds usually resolves it.
Can I still use a transfer that turned oily after storage?
It depends on severity. Light surface oiliness often clears up with a quick re-cure and still presses well. Heavy, sticky residue usually means the transfer never cured properly, and reprinting beats salvaging it.
What humidity level should I keep my print shop at to avoid oily film?
Aim for 40% to 60% relative humidity. Above 60%, film and powder absorb enough moisture to interfere with curing. Below 40%, you risk static issues with powder adhesion instead, so a mid-range reading works best.
Does oily residue affect how well the transfer sticks to fabric?
Yes. Oily film usually signals incomplete curing, meaning the adhesive powder didn't fully bond to the ink layer. That weaker bond can lead to cracking, peeling, or reduced wash durability, even if the print looked fine at first.
Is oily residue more common with certain DTF films or powders?
Yes. Budget film with inconsistent coating and low-grade powder trap moisture unevenly during curing. A premium film and powder combination, matched for consistent melt behavior, significantly reduces how often oily patches show up.


Comments